


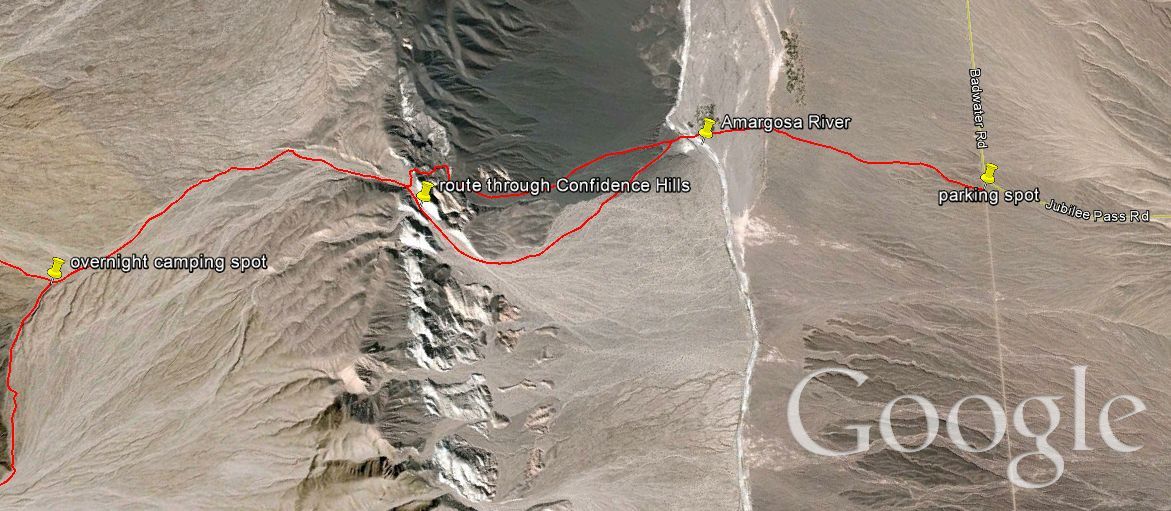
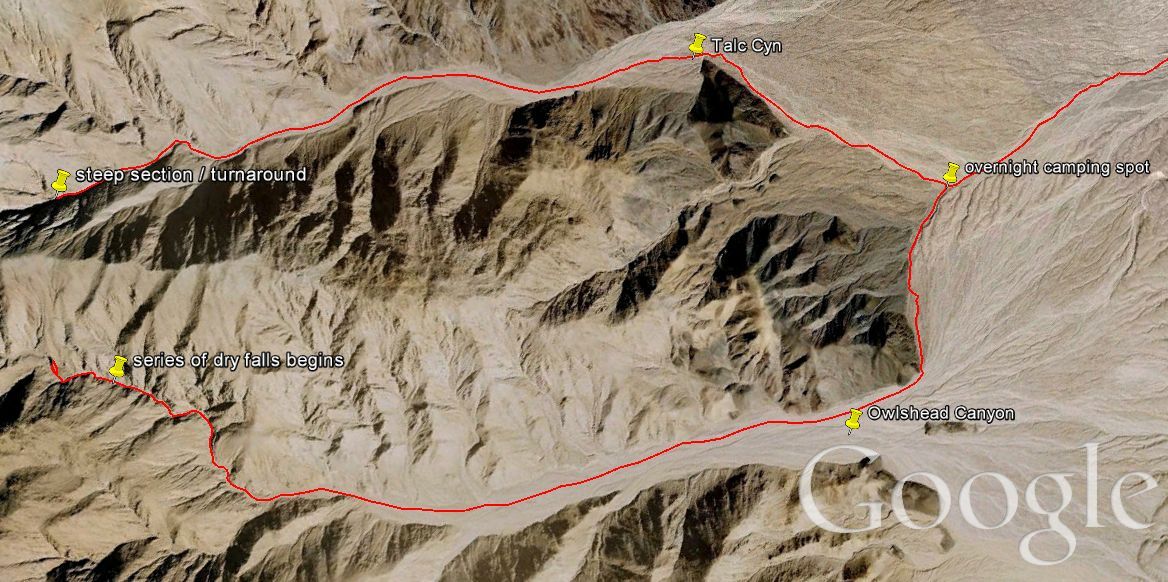
The report for Owlshead Canyon continues where the Talc Canyon report left off. I had just backpacked overnight, camping at a spot directly in the middle of Talc Canyon and Owlshead Canyon. The Google Earth map I have included below should give you a better understanding of how and where I did this. Upon waking up on the 2nd day, I took a daypack and hiked deep into Owlshead Canyon. Using the 7.5 minute topographical map, I was able to get as close to the head of Owlshead Canyon as possible. There are at least two major splits in Owlshead Canyon. The key to staying in the main canyon is to veer right (northwest) at each of these junctions. Of the five major officially named canyons in the northern Owlsheads (Talc, Owlshead, Contact, Granite, and Through), so far I have found Owlshead Canyon to be the most interesting. Let me tell you why. Early on, the canyon is very wide and somewhat boring. I actually got to the point where I was wondering what I was doing here. But, after the 2nd major canyon split, the canyon narrows down and gets extremely interesting. There is a very pretty slot-like are to walk through. Next comes a series of intimidating dry falls which are nearly impossible to bypass. I recommend that all hikers stop at the base of the 1st major dry fall of Owlshead Canyon. The bypass is risky and the rewards are small for getting past the 1st dry fall. Just past it, there are at least two additional major dry falls. If you want to see the upper canyon, the best route would be to come in from the opposite side and swing through on a backpacking trip or something.
One thing I should mention about this hike is that I originally had intended to loop hike Owlshead Canyon and Contact Canyon, thus covering both in one day. However, as I hiked into Owlshead Canyon I realized I would have to make a choice. I could either complete the loop and cover both canyons half-heartedly. Or, I could give my full time and attention to Owlshead Canyon and forget about Contact Canyon until another day. It was a tough choice, but I decided to go with the 2nd option and just focus all of my energy on Owlshead Canyon for this day. And I'm extremely glad that I did. It was definitely the right decision. Just past the point where I would have needed to take a side canyon to loop over into Contact Canyon, is where the very best scenery of Owlshead Canyon started. Had I looped the canyons in an effort to cover both in one day, I would have missed out on a lot in Owlshead Canyon and would never have viewed the canyon the same. I would have ended up thinking it was a disappointing canyon, whereas it was actually amazing. Flexibility is the key, and on this day I made a very wise decision to drop the loop hike over into Contact Canyon. (Note-- click on the two Google Earth route maps to enlarge them).
One thing I should mention about this hike is that I originally had intended to loop hike Owlshead Canyon and Contact Canyon, thus covering both in one day. However, as I hiked into Owlshead Canyon I realized I would have to make a choice. I could either complete the loop and cover both canyons half-heartedly. Or, I could give my full time and attention to Owlshead Canyon and forget about Contact Canyon until another day. It was a tough choice, but I decided to go with the 2nd option and just focus all of my energy on Owlshead Canyon for this day. And I'm extremely glad that I did. It was definitely the right decision. Just past the point where I would have needed to take a side canyon to loop over into Contact Canyon, is where the very best scenery of Owlshead Canyon started. Had I looped the canyons in an effort to cover both in one day, I would have missed out on a lot in Owlshead Canyon and would never have viewed the canyon the same. I would have ended up thinking it was a disappointing canyon, whereas it was actually amazing. Flexibility is the key, and on this day I made a very wise decision to drop the loop hike over into Contact Canyon. (Note-- click on the two Google Earth route maps to enlarge them).

SAFETY ALERT-- This hike contains sections of climbing, exposed bypasses and/or high dry falls and requires safety ropes & equipment in order to complete the entire hike. In order to maintain personal safety, it is recommended that all hikers stop at the 1st major dry fall near the end of the canyon and not try to get past it.

The first two pictures show the drainage I stayed in to wrap around to the mouth of Owlshead Canyon from my camping spot:


Looking back towards Telescope Peak from the mouth of Owlshead Canyon:
Looking at the back side of Shoreline Butte from the mouth of Owlshead Canyon:


Just about to the beginning of the canyon. I knew Owlshead Canyon would have to be somewhat special since it was the canyon named for the mountain range, so anticipation was high:

Looking up the hillside at the beginning of the canyon:

First view into Owlshead Canyon. The initial impression is that is is potentially wide and boring for a long time:

These next three pictures show some views of the hillsides and mountains contained in the early canyon:


Picture of Steve looking back out the mouth of Owlshead Canyon:

This picture shows the first major junction in Owlshead Canyon up ahead. A loop hiker heading for Contact Canyon would have to turn to the left, while somebody staying in Owlshead Canyon would stay to the right:

More of the early scenery in Owlshead Canyon, prior to reaching the first major junction:

The is a side canyon off to the south. Just past this side canyon, the first major junction is reached:

Staying close to the wall on a beautiful morning:

Looking back down the wall at the canyon mouth:

There definitely were some high peaks on both sides of the canyon:

The second major junction is now up ahead. Another opportunity exists to turn left and look for a route into Contact Canyon.

Steve analyzing the 7.5 minute topographical to make sure he is staying in the main canyon:

Passing reddish colored rocks on the left side of the canyon:

Almost to the second major junction now:

At the second major junction shown here, I made the very wise decision to stay in Owlshead Canyon by turning to the right. If I had chosen differently, I would have missed some amazing sights, as you will see in my pictures below:

Heading for a narrower section as I made my final decision and stayed in the main canyon, thus leaving Contact Canyon for another day and trip:

One thing about the 5 major named northern Owlshead Canyons is that they all seem to have the best scenery in between the mid-point and head of the canyons:

The canyon may look like it ends up ahead, but it actually cuts through to the left with hardly any elevation gain:

This is what it looked like just around the bend. Notice the small caves visible in the next two pictures:


Owlshead Canyon had narrowed down quite a bit and it would stay that way for the rest of the hike:

Entering the slot-like area which I was surprised to come across in Owlshead Canyon:

This is scenery in the Owlsheads at its best, with a narrow passage through the unique canyon walls:

Steve in the slot-like area of upper Owlshead Canyon:

The next two pictures show very interesting formations found on the canyon wall in the slot-like passage:


Past this spot, the canyon continued to be very pretty and interesting:
Finally, I reached this 20 foot dry fall which was totally unexpected and signaled the likely end of the hike:


Steve standing by the 20 foot 1st dry fall of Owlshead Canyon. This is a good stopping point to get a picture and turn around since the bypass routes are not safe in this area:

Several hours later I had returned to camp, packed up, and was backpacking out across the Amargosa River. This time I took off my hiking boots and walked directly through the water. What an incredible two days:
