TRIP REPORT PHOTOS
To reach The Cauldron, the wide wash of Fall Canyon must be crossed from one side to the other:

This is the faint use trail which climbs up the northern bank of the Fall Canyon wash:

From the plateau on top, there are great views overlooking the southern portion of The Cauldon:

We followed the first gully we found down into the wash of the main south fork:

The main south fork is mainly just a route to pass through. There isn't a lot of interesting scenery in the upper portions:

About halfway down, there are views of the northern portion of The Cauldron:

Zooming in on some of the eroded cliffs we would be checking out later in the day:

Eventually, the main south fork narrows down as you near the bottom:

In this view, you can see how the minor natural bridge looks when first seen from a distance:

Badlands Bridge, as this minor natural bridge is known, is a bit reminiscent of Little Bridge over in Tucki Mountain:


South side view of Badlands Bridge:

North side view of Badlands Bridge:
Badlands Bridge is labeled as a minor natural bridge. However, it is possible that it is a false natural bridge. It is really hard to say for sure:


We didn't manage to get any pictures of the chaos fork until later in the day after sunset. These next three pictures will give you a brief glimpse of the chaos fork, but it looks much more impressive during daylight hours:

The chaos fork has canyon walls with huge bulges, diagonal lines, and rock shelves all over:

For a few better pictures of the chaos fork, check out our report on Palmer Canyon:
View of an impressive rock wall near the junction of all forks:

We are now heading up the central canyon which heads east from the junction of all forks:

Three of the best smaller forks can be reached by heading up this central canyon:


A truly towering canyon wall with odd shapes and designs all the way up:
The highlight of this central canyon is definitely the unique composition of the walls:

Passing through some early narrows in the next two pictures:


The narrows grow in impressive height as the central canyon continues:


A dry cascade area that is very scenic. You can imagine how water would look flowing down these small falls:
Truly magnificent scenery hidden away within The Cauldron:

The central canyon then completely opens up as you continue hiking to the east:

Off to the right, a fork is visible. This is the tight slot fork:

The tight slot fork is aptly named. The extremely tight narrows start right away:

The narrows remain shallow but tight as you progress through them:

An easy climb at a beautiful spot within the tight narrows:

We followed the fork up past the narrows and there wasn't much else to see. So we obtained the ridge above the fork:

Zooming in on the false bridges fork as seen from the ridge plateau:

Zooming in on the much farther away mini-Bryce fork from the same spot:

We crossed over the hillside using some sheep trails heading to the northeast:

Looking down into our next objective, which was the best slot fork:

We first dropped into the best slot fork at the upper end and began heading up canyon:

There wasn't a whole lot to see except these massive fallen boulders near the end:

After heading back down the fork, we entered into the back end of the slots section:

I called this section the best slot fork because that's exactly what it is -- a lengthy stretch of spectacular narrows:

The canyon walls are higher in this area and the narrows continuous:

A small wash path winds through the narrows:

A brief open section transitions quickly back into slot narrows ahead:


There are a few easy to medium difficulty climbing spots within these narrows:
There are also spots where giant boulders have rolled into the canyon and created tunnels which must be crawled through:


At this particular spot, you can either crawl through on the right or on the left:

The beautifully-sculpted narrows through here make for great pictures:
Alternate landscape view of the picture above reveals more side details:

Another low tunnel created by fallen boulders to crawl through:


Sunlight has trouble penetrating the depths of the best slot fork narrows:
Another alternate landscape view showcasing the beauty of this area:

The crawling and getting your clothes all dirty is not through yet:

The next two pictures show how the best slot fork ends in dramatic fashion:


The fork ends by depositing you back into the central canyon in the middle of more narrows:
Seeing that we were in more narrows, we headed down canyon (toward where we had earlier turned off into the tight slot fork):

Notice the variety of colors visible within these narrows:

Upon turning around and heading back up canyon through the narrows, we entered another open area:

Soon we entered into the false bridges fork. I had been here before previously (as noted at the bottom of the Death Valley's Natural Bridges database page here on the site):

This diagonal column which crosses the canyon appears to be a natural bridge from a distance:

Walking under the formation and viewing it from the backside:


A closer inspection is done in the next two photos which determines that this is a false natural bridge. It is probably a collapsed canyon wall or oblong boulder which fell into the canyon:

Just past the false bridge is a dry fall which is a little too challenging to climb. Another wedged boulder can be spotted up canyon:

Standing underneath the false bridge makes the formation look quite impressive:

We then exited the false bridges fork and found a way to scramble up the hillside to the west:

Looking back across the eastern half of The Cauldron:

Following along the ridge above the false bridges fork:

With some minor difficulty, we then dropped into the upper portion of the false bridges fork:

There wasn't a whole lot to see, as the narrows were very short before reaching the top of the dry fall:

We then climbed back up to the ridge and had this view across a long, flat plateau toward the northern section of The Cauldron:

Panoramic showcasing the eroded cliffs of The Cauldron above the mini-Bryce fork (click to enlarge):
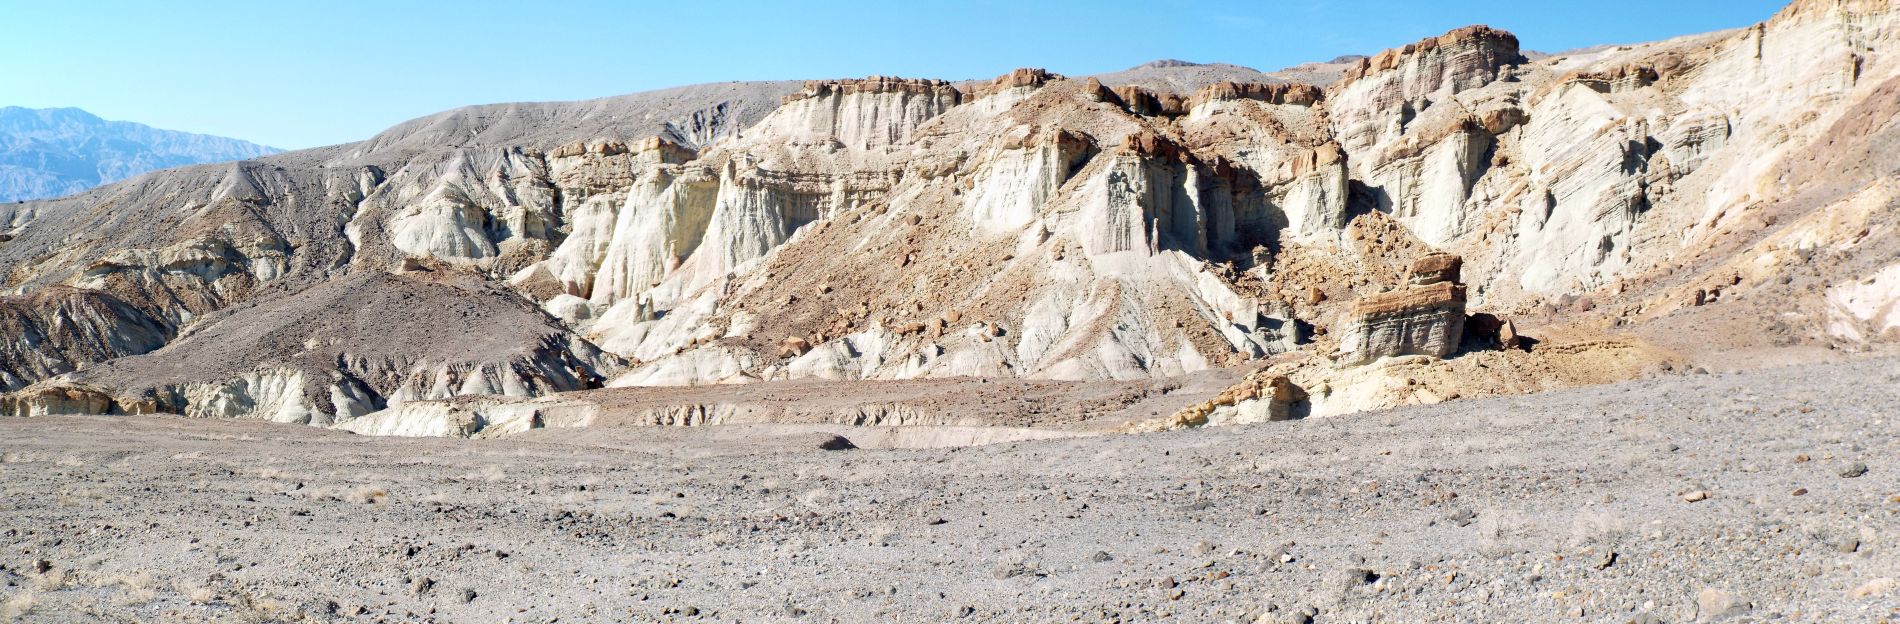
Zooming in on the upper portion of some of the eroded cliffs which reminded me of Bryce Canyon:

Below the cliffs are the impressive pinnacles seen in the next two pictures. Keep in mind that these are long-distance photos:


The weathering and erosional process to form these eroded cliffs is quite amazing. In Bryce Canyon, the primary weathering force is frost wedging. In Death Valley, it is wind and rain:

After crossing the plateau, we dropped into this drainage which headed towards the main north fork's upper end:

It was a mostly shallow drainage with great views to the north:

We did pass by several impressive formations, as seen in the next three pictures:


Here we have merged with the main north fork and are about to head up canyon:

The terrain of the hillside was oddly textured all through the area:

The upper main north fork was quite different from the rest of The Cauldron:

This rounded canyon wall looks like it has its mouth open:

A very impressive view looking up into the pinnacles fork:

The pinnacles fork has a double pinnacle at the bottom and a rock-topped pinnacle just above it:

This canyon wall has a natural window to look through:

We were now heading up the mini-Bryce fork of The Cauldron:

The mini-Bryce fork leads to this massive amphitheater reminiscent of Bryce Canyon:

Looking up, it is easy to imagine yourself being transported some 280 air miles away to Bryce Canyon National Park:

Check out the huge boulders which have broken off and rolled down the hillside:

At the end of the fork is an area of impenetrable cliff faces:

The boulders get too large and extensive to continue any farther up the fork:

One of the mini-peaks above the fork has uplifted strata:

Heading back down canyon, we noticed this hillside which has been intersected by small drainages:

We backtracked to the junction with the pinnacles fork, which would be our final one of the eight forks to check out:

The next two pictures show views of the pinnacles (perhaps better called hoodoos to keep with the Bryce theme) while hiking up the fork:


Huge vertical cliffs rose up above the pinnacles:

Looking back down from a side drainage we began following up to the main ridgeline:

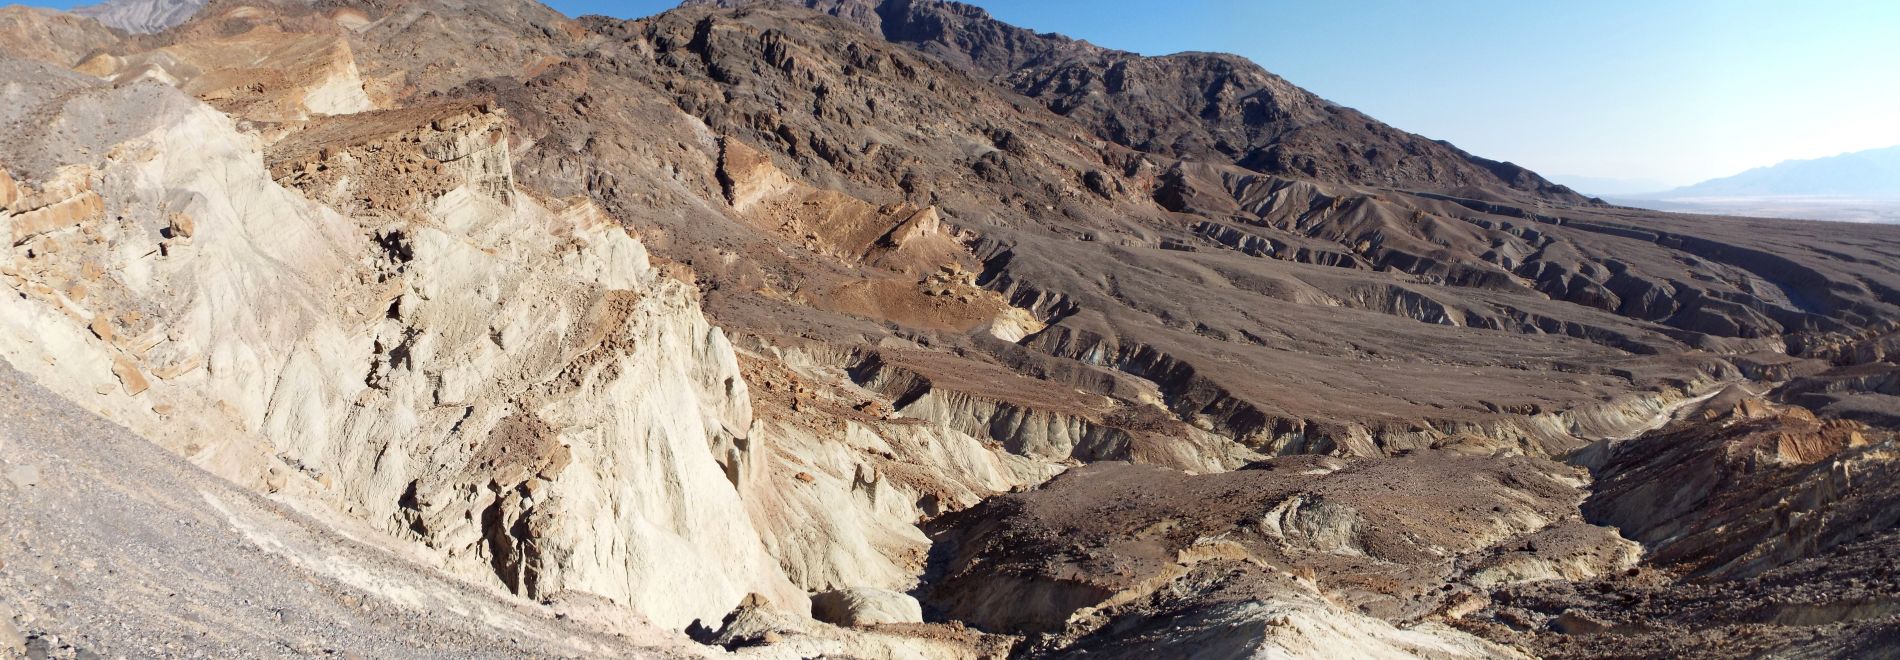
Panoramic overview of The Cauldron from the main ridge showcasing the circular design of the area (click to enlarge):
1 hour and 45 minutes later, we arrived at Turret Natural Bridge. While this major natural bridge is actually closer to Little Arches Canyon, we visited it on this hike so the pictures are included here:

Getting a picture at the 10-foot high doorway entrance beneath Turret Bridge:


Turret Bridge was discovered by Kauri and her original report on the discovery can be found online if you are searching for the location:

Looking back at Turret Bridge after passing through the drainage wash:

A unique angle showcasing the canyon span:
These natural colors and designs on the bridge wall are quite colorful and unique:

Looking straight up from underneath the bridge:

Two pictures taken while attempting to frame the background terrain with the bridge:


Our final picture shows Josh looking through Turret Bridge: